Free background from VintageMadeForYou

Wednesday 16 October 2013

Oriental, but not Oriental!

Well hello my blogland friends. It has been a while since my last blog. I have had a couple months of crafters block, but I am back. I decided to make a different shape from the norm, so I went for a circle. so here goes.

I used the Xcut Circle cutter to cut out three 8 inch circles. I scored one of the circle at 4 inches and 1 inch. I folded the card in half at the 4 inch score and folded the 1 inch score and used the flap to attach the two circles of card together. I the glued the third circle of card to the folded card circle to form an easel card. I then matted the base and the top of the easel card with gold Mirri card and then layered that with red core-dination card stock. Now on to my favorite part of card making, the embellishment. I received a Tattered Lace butterfly die for my Birthday a week ago and I decided to use it on this card. The die cuts like a dream, there is no need for wax paper at all


I used the largest and second largest Spellbinders Gold Labels four to make the mat and layer for the butterfly. I cut the largest  die cut in gold and the second largest in red core-dination's card. I cut out the Tattered Lace Butterfly out twice, again one in gold and one in red. I clued the red butterfly onto the gold butterfly, just the body, so the wings were left free. I then attached the butterfly to the gold labels four die cuts. I then cut out 5 Sizzix star flowers again in gold and red and I also cut the Tattered Lace flourishes that came with the butterfly die several times. I placed the flourishes at either side of the top of the easel card. I placed two of the star flowers at the top of the card and two at the bottom of the card so it looked like the flourishes were coming from the flowers.

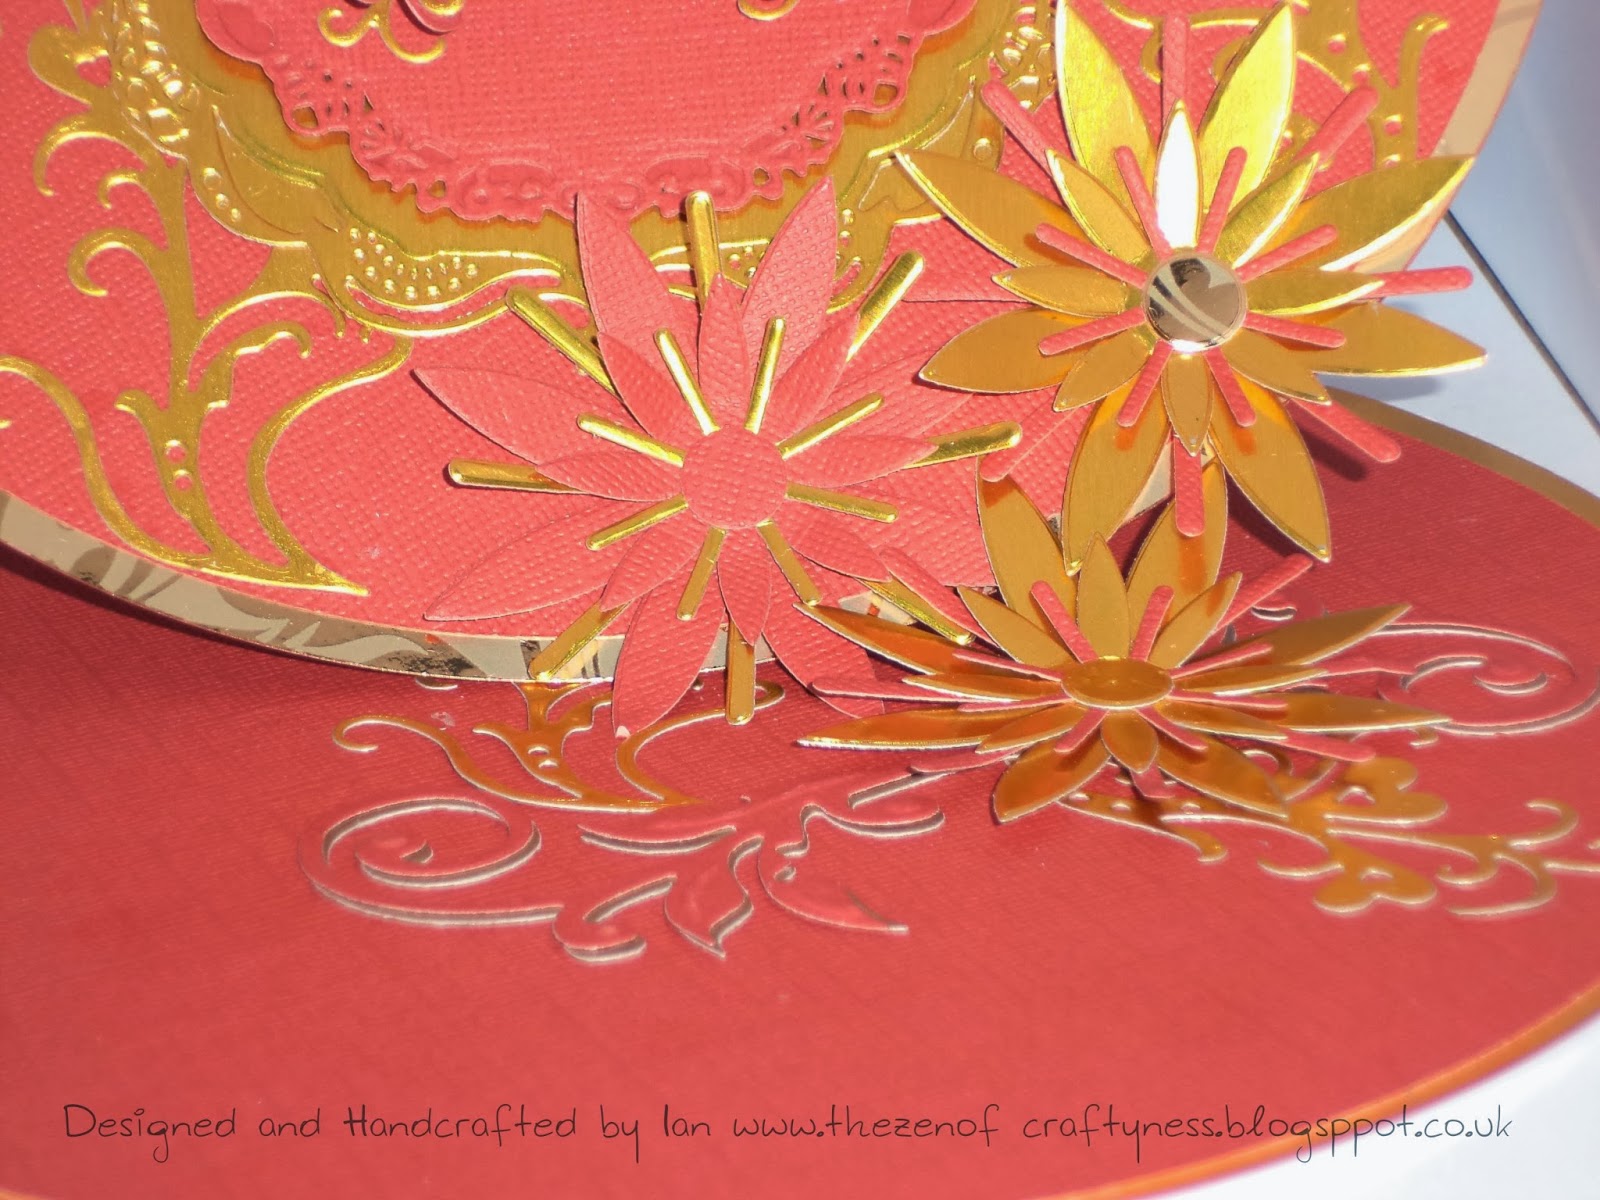
Now onto making the stopper. I didn't want to go down the normal route of using a narrow matted and layered strip of card, so I was thinking about what I could use. After a few cups of tea and a couple of biscuits, oh well nearly a packet, the light bulb turned on, why not try using one of the Sizzix Star Flowers. I didn't want to just plonk the flower on the base, so I decided to had a little bit of a flourish, so I cut two Joy Flourishes again in, guess what two colours, yep you got it, red and gold. I attached the red flourish on top of the cold flourish, so it looked liked the red flourish has a gold shadow. I cut two Tattered Lace flourishes again in gold. I attached the Joy flourish east to west and the two Tattered Lace flourishes north to south on the base of the easel card.

Then I was hit with a little bit a genius, but unfortunately it only lasted until the card was finished, I had the idea of, if I placed the flower that was going to be the stopper, in the right place, it would make a trio of star flowers. I tried it without sticking the flower stopper down to see if it would look OK and work. The flower did the trick and as a bonus it looked good as well, so I stuck the flower in place

So there we have it, my red and gold delight. I hope you enjoy my project.


Ian.


Sunday 9 June 2013

Deeper under the sea.

Happy Sunday blogland. I hope the sun is out and you are having a good day.

I've have been trying out different card shapes, from the usual side, tent fold and easel cards that I usually create. This is my first attempt and I don't think it turned out too bad. I also used my favourite stamp at the moment, the cute mermaid Stamp from La La Land. Let's get to the make......


I wanted to try a variation of a gate fold card. For my card blank I used 2 6x6 scalloped edged cards. I folded the front of both cards in half, so the card front met the central fold. I then glued the two cards together using Cosmic Shimmer glue. I then stamped the image onto bleedproof card. I decided to challenge myself to using different colours of ProMarkers, than I usually use. For her skin I used almond, pale pink and Soft peach ProMarkers. For her hair I used blue grey 1, glacier blue and soft aqua flex marker. The next set of colour, I will be really honest with you, I have never used, just because I didn't think the lightest colour would blend into the other ones. I was happily surprised. For her tail I used holly, forest green and lime green. For her top, I used amethyst and cerise. When all the image was coloured, I fussy cut the image out. To decorate the inside I matted and layered using black card and blue and white spotty paper from my stash. The next layer is yet again is another thing that I have never used before. In my stash I had an A4 sheet of white vellum, that was foiled with silver foiled swirls. The swirls reminded me of waves, so I layered in on top of the blue spotty paper, I used collall 3D glue gel to attached it to the paper. So the glue didn't show, I placed the glue gel in the center of the vellum, because I knew my topper would hide it. I cut out the largest and second largest shapes from Spellbinders decorative labels 22, in black card and green mirri card, I attached them to the vellum using cosmic shimmer. I used 3D glue gel to attach the mermaid to the matted and layered decorative labels 22. For the two front panels I matted and layered it with the green mirri board and the blue spotty paper. I then chose a die cut sentiment from my stash and coloured it with weathered wood distress ink from
Tim Holtz, so it would tie in with the rest of the design. I matted and layered the blue spotty paper onto black card. I attached the sentiment onto the matted card with 3D glue gel and attached it the the front of the card with double sides tape. I then used blue dew drop embellishments from DoCrafts, in different sizes to represent bubbles on both of the front panels and inside the card to represent air bubbles coming from the mermaid.

There we have it, my take on a gatefold card. I hope you enjoy it.

Ian xx

I would like to enter this project into {pin}spirational challenge Challenge #60

Monday 3 June 2013

All Craft Challenge Blog Hop

 Welcome Blogland to the Craft my life blog hop for the re launch of Sparkling black roses blog challenge. The challenge theme was anything but a card. You've found my part of the hop, by visiting the lovely Tania, and enjoyed Tania's brilliant creation. Now it's my turn. This is my first ever time being involved in a blog hop and I am really excited, to be apart of Elaine's re launch and I love the theme, because I have just ventured into altered art and having another chance to create something using the fabulous product of Sarah Hurley, made my creative juices flow. So onto my project.

I have had a set of nesting boxes in my stash for awhile, so I decided to alter the largest box, but what could I turn it into. One of my favourite kits from Sarah is the the Expedition kit. As with all of Sarah's kit it is packed full with hand drawn papers and embellishments. In fact the kit gives you 12 12x12 resizable papers, 88 hand drawn embellishments, 2 x printable embellishment sheets and an alphabet. Some of the hand drawn  images are of vintage modes of transport. From vintage hot air balloons to tallships. So I decided to create a keepsake box for holiday memorabilia.

I used CraftArtist to print out a selection of the lovely papers and embellishment. I couldn't decide on which of the papers to use to cover the box, so I decided to use torn pieces of all the papers in a collage. I used A'color Allround Medium to glue the piece onto the box and seal them, with a gloss finish. Now the fun part embellishing the box, I printed out two more papers from the kit and used bitty blossom dies, from Spellbinders to cut the flowers and leaves. I also used a set of spellbinder flourish dies to cut the flourishes from the same papers. I fussy cut all the embellishments out, some of them words. I chose to use the binocular embellishments and the words See and Do to decorate the lid. I glazed the lenses of the binocular, with a 3D glaze. I then used the embellishments both images and words to embellish the sides of the box. I then used some self adhesive material to line it.

There we have it my Anything but a card project, My travel memory keeper.

Thanks you for visiting me on this part of the blog hop. I hope you like my interpretation of the challenge theme. The next stop on the blog hop is the lovely Lydia and you can hop over here . Again thank you for stopping by, and enjoy the rest of the hop.

Ian xx


Friday 31 May 2013

All that Glitters is Gold


Hello Blogland it's that time of the month when the lovely Sarah Hurley launches her new blog challenge. Challenged 81's theme is All that glitters is gold. So you can go all out with your goldness or just hints, it's entirely up to you. So pop over and have a look at the rest of the design teams interpretation of the theme, that was chosen by the lovely Candice, here. So OK here my interpretation of the theme.

I was sent some book templates from my very good friend Wendy, and as soon as I saw them, I knew what kit would go well with them. Bookworm is the latest in a very large range of hand drawn digi kits, from the very talented Sarah Hurley. The kit is packed with 12 12x12 papers, 40 embellishments and just for good measure Sarah has included 5 hand drawn digi stamps, so packed to the rafters with crafting goodness. For more details of Sarah's Bookworm kit please click here. All of Sarah's kits can be easily added to any platform of Serif CraftArtist, please see my tutorial post for a step by step guide.


 I drew round the templates onto card and cut them out. I did the same with the book shelf paper, embossed mirri board and the ledger paper. I adhered the book shelf paper onto the largest page and went round with some yellow and gold chain link peel offs from my stash. I did the same with the ledger paper. I used red liner tape down the spine of the underside of the small page to adhere it to the embossed mirri board page and then I used a gold sequined ribbon down the middle to look like a bookmark. I attached the larger page to the other two pages the same way. I cut some flourishes out of two different shades of gold using Spellbinders dies and used them to embellish the bottom left and top right corners. I chose the book stack embellishment from the kit, I used CraftArtist professional 2 to resize and flip the embellishment. I also used CraftArtist to resize the Sitting boy and girl and the bookworm embellishments. I then printed them out and fussy cut them out. I decided to have the boy and girl sitting on the book stacks, so I used pva glue to stick the book stack embellishments flat and 3D glue gel to adhere the boy and girl embellishments. I used 3D gel again to adhere the bookworm. I used CraftArtist again to create the sentiment, cut it out and used 3D foam pads to raise it up. There we have it, my take on the challenge theme "All that Glitters is Gold." I hope you enjoy it.

Ian xx

The Bookworm kit and all of Sarah's fabulous products can be found here.

Wednesday 29 May 2013

Easel Does it

Good Afternoon Blogland. This post is about my first Altered Art project. I really enjoyed making it so here goes.

The easel started it's life as a plain wooden easel that I purchased from That Craft Place Facebook group. I got it to display my creations, but I thought I would try altering it.

I first painted it with a coat of white Gesso, again from That Craft Place and put aside to dry. When it was dry I painted an acrylic wash in green and while it was still wet went over it with an acrylic wash in balck and left to dry. I then used Cosmic Shimmer metallic Gilding wax, the colour was golden light, to add some bling to the edges of the easel. I then used a stamp from IndigoBlu's Itsy Bitsy Background set and black dye based ink to add a bit of texture, I really should've used a stazon or an archival, but it dried eventually. Now comes the decorating. My friend and fellow member of Sarah Hurleys DT, Claire Newcombe, sent me some card candy and a few die cut bits, for being her 100th follower of her blog. To check out Claire's crafty creations Click Here. I made up the die cut flowers and and arranged them on my easel so I could see how it would look, when I was happy I glued them down. There we have it my first Altered Art project. I hope you all enjoy it.

Ian xx

I have entered my easel into the Crafting musketeers challenge #1 anything goes.

Saturday 18 May 2013

Handmade and Fab-u-lous

Happy weekend blogland, from a grey and wet Rochdale. I hope the weather is better where you are. If not here's a bright and colourful project for you. So here goes.

I have created another 12x12 digital scrapbook page, using Serif CraftArtist 2 and the All Sewn Up digi kit from Sarah Hurley.

I started by Loading the digi kit into CraftArtist 2, (if you would like to find out how, please take a look at my tutorial.) When the kit was loaded, I took a couple minutes to look at all the hand drawn papers and embellishments, before I decided on what I wanted to use. That was a very difficult decision to make, because Sarah, as always has packed the kit full of beautiful papers and embellishments. I decided in the paper with the strips of stitches design on, as my base layer. I then chose the material with the tape measure design, resized it and cut it with the the digital scissors, the cut I used was pinking, to stay with the sewing theme and I placed it vertically on the left hand side of my page. I did the same with the pattern designed material and placed it horizontally at the bottom of my page. I decided to use the tailor's dummy/manikin embellishment, I resized it and placed it over the the tape measure designed material. One of the new features if CraftArtist 2, is digital decoupage. I decided to use it on the manikin embellishment. I dragged on the pin cushion embellishment and resized it. The colour of the embellishments, didn't match the colours of my design, so I used the colour picker, to pick out one of the colours on the background and re coloured it. I decoupaged it as well. I grouped three buttons together and place them at the side of the pin cushion. I did the same with two cotton bobbin embellishments and placed them at the bottom right of the page. I place the scissor embellishment behind the pin cushion. The kit doesn't come with any digi frames, but you can turn certain embellishments into them. I will be posting a step by step tutorial on how to make digital frames on Tuesday.

The picture that inspired this project is of my younger self in one of the many fancy dress costumes that my nan used to make me, as part of my christmas present. This particular one was a hand cut, machine sewn cowboy costume. My mum as still got all the original patterns that my nan used. Don't I look such a proud and happy cowboy. 

I popped the picture into the digital frame. I then chose one of the many hand drawn journaling cards onto the page, resized it and placed my journaling on it. I used a font that is installed onto my laptop. I then found a cross stitch brush that is preinstalled on CraftArtist 2 and went round the frame and the journaling card. There we have it, my completed digi scrap page using the fabulous hand drawn kit bt Sarah Hurley.

To find out more about Sarah and to see all of her marvelous products click here.

I hope you enjoy

Ian xx

Sunday 12 May 2013

How to Load Sarah Hurley's Digikits to Serif CraftArtist.

Hello blogland and happy Sunday. As I promised on Friday I am doing my first ever tutorial. My tutorial is on how to load the fabulous digikits from Sarah Hurley in to Serif CraftArtist. It's really easy to do, so much so, I managed it ok. So here we go.


1   First open up the Craft Artist program
2   Choose blank project


 3   Choose what type of project you would like to work with and press ok

 4     A popup will appear with all your digi kits that are already installed. Because we are creating a new digi kit with Sarah’s kit. We don't need to select one, so just click on done.


 5   Click on tools. That appears in the top tool bar and chose digi kit creator and this screen will pop up. 


  6     Click on the import button.


   7     A drop down box will appear, you can either choose add files of folders, for this tutorial we are adding folders, because Sarah’s kits will go into different folders when they are downloaded.

   8    Scroll to where Sarah’s kit has been stored and click on the kit you would like to load into craft artist.

   9     The folder will open, showing different folders inside i.e. embellishments, papers and Alphabets.

I find it easier if I load the embellishments first followed by the papers.

  10     Click on the folder you want to add first and click OK.

In about 2 minutes all the contents of the chosen folder will appear in the box. Repeat steps 6 to 10 until you have loaded the embellishments and Papers. If you want to have materials in your digi kit you are creating, you can load in the paper folder and they will automatically become editable materials when they are loaded in as materials. 


Loading Alphabets


1:  click on the alphabet tab at the side of the digi kit creator side tool bar. Click on the import tab, like we did to add the papers and embellishments and choose add folder. Scroll to the folder with the digi kit you are loading and find the alphabet folder, click on it and click OK.


You will see this screen pop up. The final process is a little bit time consuming but not difficult at all.


2:  You will see a letter, icon or punctuation symbol at the top left hand corner of the box and then click on the corresponding letter, icon or punctuation symbol. If there isn't any corresponding symbol in the box use your keyboard to match the symbol.
Carry on doing this until the entire alphabet is loaded.


Saving your new Digi Kit


When you have loaded all the elements of the digi kit all that is left to do is save and name your new digi kit. To do so click on the save digikit tab. A pop up box will pop up and then you can name the digikit and press save.
After that you will see all the elements flash up as your new digikit is saved and ready for you to craft with.


So there we are, my first tutorial. I hope you find it easy to follow. if you have any questions, please leave me a comment or email me on ian.wharton@hotmail.co.uk . If I can help you I will be happy to and if I don't know the answer straight away, I will find out and get back to you.

Ian xx


Saturday 11 May 2013

Under the Sea


Good Afternoon blogland. I have got two cards for you today.  I have used the same stamp, but achieved two different looks just by using different colouring mediums. So here we go.

I saw this stamp and instantly fell in love with the image. I love everything ethereal and mystical. So she was crying out to me, to be stamped. The stamp is from an American company called La La Land. To be honest with you all, I hadn't heard of the company, but I am already on the lookout for more of their stamps.

I stamped the image onto bleedproof white card, using a black Ink-It-Up dye based ink. The stamped image was really clear. I coloured the image with ProMarkers. I used Cobalt, Arctic and Sky blue for the mermaids tail and her top, For her hair I used Canary, Lemon and Primrose. For her skin I used Soft Peach, Pale Pink and Almond. I tried to use the the technique that Sarah Hurley demonstrated on Create and Craft. It didn't turn out too bad. I then fussy cut the image and coloured the white border with a blue gray FlexMarker. For the card base I used a white stepper card from DoCrafts. I matted it with Silver embossed mirri card. I then layered that with a couple of 6x6 papers from the Beach Babe collection by Fancy Pants. I attached the image to the the card using foam pads. I used blue gems as the air bubbles. I Stamped the sentiment using a blue dye based ink and cut it out with a spellbinders Labels 18 die and I cut the silver mat with the next size up with the same die set.

One down one to go.........


This is a 6x6 scalloped edge white card again from DoCrafts. This time I coloured the mermaid stamped image with FlexMarkers. For the hair, tail and the top, I used blue grey 1, glacier blue and soft agua. for the mermaids skin I used pink lavender, pale blossom and muted pink. I cut the image out using labels 18 and inked the edges with Tim Holtz weathered wood distress ink. I matted the card blank with blue mirri and layers with a Teresa Collins 6x6 Fabrications paper collection. I attached the image to the card blank using foam pads and finished of the project off with the blue embellishment cut from the trailing leafs die from crafts too.

There we have it two cards, two different results using the same stamp.

I hope you enjoy

Ian xx

Friday 10 May 2013

Wherever you may be.

Good afternoon blogland, I've got a 12x12 digital scrapbook page to share with you today. I created the page with Expedition by Sarah Hurley digital kit. So how did you do it I hear you cry, well lets go....

When I first looked through the kit, I was amazed at the quantity of the kit. The quality speaks for itself, because the kit was designed by Sarah and not only did Sarah design the kit, she drew all the elements herself, by hand. In the kit there are twelve, 12x12 papers, that can be resized so they can be printed, 88 hand drawn embellishments, 1 alphabet and two A4 sheets of hand drawn embellishments. So the kit is bursting at its seams, with all you would need to document and capture your holiday memories and so much more.

I started by loading the kit into CraftArtist by Serif. I will be posting a step by step tutorial on how to load all of Sarah's digi kits onto CraftArtist on Sunday. It's really simple to do, even I managed to load the kit with no problems. I will also be showing you how to turn Sarah's embellishments into digital frames. So pop back on Sunday if you have some spare time.

When the kit was loaded, I first pulled on all the 12x12 resizable papers onto my workspace one by one, so I could see all the beautiful papers. I decided to use the wood effect paper. I then did the same with the material. I decided to go with the yellow striped material, because I thought it would  look like wallpaper against the wood effect paper. Everything started to fall into place. To give a ripped wallpaper effect, I cut the material with the digi scissors.  I was happy with the ripped paper look I had created. Now it was time to look at the embellishments. Whilst looking at the embellishments, I noticed the tall ships and the hot air balloons that Sarah had drawn beautifully and they jumped out at me. I decided to pull the two hand drawn tall ships and the two hand drawn hot air balloons onto my work area. I resized one of the tall ships, to give the effect of distance and faded it a little with the transparency tool. I did the same with one of the hot air balloon and applied a drop shadow to the ripped paper and all the the embellishments.I wanted to use a sentiment that meant something not only to me, but to other people as well, but I was struggling, until I looked at the embellishments and they gave me some inspiration.

I moved away from my hometown nearly 9 years ago and I try to go back to see my parents as often as I can, but sometimes life just gets in the way. To remind me that my parents are always there, especially my mum, I made up my own sentiment, using a font that was already loaded on my laptop. I then pulled a photograph of my mum. If she looks fed up, she was, because She was trying to have a rest, but it's hard when , you've got someone saying smile every two minutes. Sorry mum. I faded the picture using the transparency tool and I chose to use the plasma effect, to give the photograph the look like it was in the clouds, with the hot air balloons.

There we have it. A reminder for myself, that even though I am 60 miles away from my mum, she will always be there for me, no matter what.

I hope you enjoy.

Ian xx

The Expedition by Sarah Hurley digi kit and all of Sarah's marvelous products can be found here and if you've got a spare few minutes pop over to Sarah's blog for tips and inspiration from Sarah herself.

Friday 3 May 2013

Vouge


Well blogland, It's here, my latest creation, but not only is it that, it's my first ever DT entry into Sarah Hurley's Blog Challenge. It doesn't stop there, Oh no, I used one of Sarah's brand new kits, that was launched this week, but more about that later. Yet more news The third volume of the LookBook is out. It is packed full of ideas and inspirations from Sarah and the design team, but there are two projects by yours truly in there, my mixed media project and this project. I was my debut outing in the world of the Crafty Magazines. You can have a look at all the Design Teams lovely projects here, just below Sarah's post about the brilliant Gatsby kit. The name of this months challenge this month, is Shades of Blue and you can check out all the design teams entries and entry yourself here.

I chose the gatsby kit for my12x12 digiscrap project, because of all the lovely shades of blue, funnily enough and because when I saw the images, I knew what photo I was going to use. I started by loading the kit into Serif CraftArtist. I saw the Art Deco embellishment, and it screamed out to be made into a frame. I started by choosing the papers for the background, there were so many to chose and all has lovely has each other, I had to use a few of them. I dragged them onto my work area one by one, resized them and cut them up with one of the digital scissors. I then played around with the layout and when I was happy, I used the transparency slider to fade the pieces of cut up papers to different degrees. I then dragged on the frame that I had made, out of the hand drawn  blue Art Deco embellishment onto my work area and snapped my picture into it. the pictures is of my late nan. I then added a shadow and dragged and layered the floral embellishments and added shadows to them as well. I then added a journaling embellishment with the same design as the floral embellishments and used that for my journalling. I finished off the project by adding the two glamorous ladies again hand drawn by Sarah, to frame both the photograph and my journaling.

There we have it my first DT blog challenge entry. I hope you enjoy.

Ian xx

The Gatsby kit and all of Sarah's fantastic products can by found here on Sarah's website, where you can also find Issues one and two of the LookBook.

Saturday 27 April 2013

My Easel Period

Hello Blogland, These are two of my creations I was asked to make for my neighbor, the evening before the person's birthday. I am not one to turn down a challenge, I said OK. I think they turned out ok, the recipient liked them, and that's the main. I was going through an easel card period as well. So here we go.

To make the easel card I used two A6 card blanks. I started by folding one side of one of the blanks in half. I tried to use the center crease as a guide and then used my bone folder to make the crease that I had just made more defined. I then cut the second blank in half, down the center crease, ready to be decorated and attached to the first card blank.

I decided to decorate the half of the card blank, first. I was going through my crafty stash and I came across some papers and toppers, from Do Crafts that I had bought 12 month before and decided to go with them. to me, Faeries are timeless and span the ages. I started by choosing a topper and match the backing papers to it. Lookly enough Do Crafts and done that for me, all the papers match the various toppers. I chose the topper with the faerie flying with butterflies in front of her. I matted and layered the topper onto black card and silver mirri card. The paper that I picked for the card blank that I had cut in half, is a graduated starry background. I chose a sentiment to match and again matted a layered it with black and silver miri card. I then layed the topper and sentiment on to the card without sticking them down, to work out the layout. When I was happy with the layout I stuck the image and sentiment to the card. In the die cut topper sheets I found some corners, so I used then in the corners of the cut in half card blank, to tie everything together. I then decorated what would be the bottom of my easel card in the blue starry paper from the paper set. I then used double sided tape to attach the the decorated half card blank to the folded half of the A6 card blank. I only put the tape on the bottom half of the decorated half card blank, so it would stand up with the aid of a stopper. For this I used an Happy Birthday sentiment, I used 3D foam tape to attach the sentiment to black card and matted both of them to silver mirri card. I then decided on how proud I wanted the easel to stand. When I was happy I stuck the the stopper down.

This is another easel card this time using a 6x6 scalloped card. I decorated this one, with free papers from a crafty magazine and  I used my grand calibur to cut the elements from Spellbinders Persian motifs set in coordinated colours.

There we are, two easel cards. I hope you enjoy.

Ian xx

Wednesday 24 April 2013

Life is just a journey!

Hello Blogland, I have seemed to move away from the good old cards for my last post and this one. But as they say "Variety is the Spice of Life!" So I bring you my first ever mixed media project.

I had a canvas in my crafty stash, that I bought about a month ago, has I was going to have a dab at acrylics, but never did.When I was sent the Curio by Sarah Hurley digi kit, I thought I would try a mixed media project and combine the two, Sarah's Curio digi kit and the canvas.

The canvas was already sized with gesso, so that was one problem out of the way. I started by printing three sheets of the background papers, the blue butterfly, the cream butterfly and the script papers. I just ripped the paper up, I was not bothered if the pieces weren't uniform in size, because I thought it would work better. Ripping paper by the way, is a great stress reliever. I then brushed a thin layer of drys clear PVA glue and started to stick. I tried to be as random as I could when picking up the pieces, but looking at the finished project, I didn't quite manage it lol. After I placed a piece of background paper, I brushed a thin layer of the drys clear PVA. I carried on covering the canvas until it was completely covered. I then brushed a final thin layer of the drys clear PVA over the completed canvas, the edges too and put aside to dry.

I was looking through the embellishments in the kit and found some butterflies that match the background papers. I loaded the kit into Serif CraftArtist and I opened an A4 blank page. I then dragged the butterfly embellishments onto my work area, resized them, so they would fit on an A4 page and printed them out. Then came the hard part, and when you hear what it is, you will be thinking "That ain't hard!", but all will be explained lol. I have never been the best cutter outer. From being a child until now, I even cut, leaving a jagged  edge or cut into the design. I try to move the thing I am cutting out and not the scissors, but still no joy. Any tips from my fellow Crafters will be greatly received! I manage to gut out all the butterflies and then had a play with positioning and how many I would use. I decided on using the ones that has some blue in them. After a lot of umming and Arring I decided that I would only use two and I would place them on the top left and bottom right corners of the canvas.

That left me with another choice to make, what to put in the center of the canvas. I opened up the Embellishment file of the kit and one of Sarah's sentiments that jumped out of me straight away. "Enjoy the journey" Why this sentiment though. The passed couple of years have not been the smoothest and I have found myself getting completely stressed at the smallest thing, so one day I decided just to sit back and change the things that I could and not worry about the things I couldn't, because life is just a journey and nobody knows what lies around the corner. So I chose this sentiment as a constant reminder to, sit back and enjoy the journey. I pulled the sentiment to my work space on CraftArtist and printed it out. I then cut it up using a guillotine, again any tips on how to cut a straight line using a guillotine, will be gratefully received, and put it to one side along with the two butterflies that I had already cut out, ready to attach to the canvas when it had dried. I decided to add a little sparkle to the butterflies wings, so I used a quickie glue pen and some ultra fine glitter in blue and purple.

when the canvas was completely dry I attached the butterflies to the top left and the bottom right corners, using the same PVA glue that I used on the canvas. I attached the sentiment to the middle of the Canvas using 3D foam tape.

There we have it, my constant reminder, that life is just a journey.

I hope you like it.

Ian xx


Tuesday 16 April 2013

If only I had the Nerve.

Well hello out there in blogland. I thought I would share my latest project with you and this is a little different from what I have shared before.

I decided to share a scrap page with you today using the fantastic digikit Oz by Sarah Hurley. When I received the kit and first looked through it, I knew that it was going to be a kit that I would use often with my digital scrapbooking.  The kit is packed with papers, embellishments and even digi stamps. All the images have been hand drawn by Sarah herself. Sarah has managed to put her own unique style into her drawings of the well known characters.

I used Craft Artist by Serif with the digikit and it was so easy to add.

For this page I used the background with the signpost and overlayed the image of the brick road and Oz embellishment onto it. I then used a pale blue paper and cut it by using one of the digi brushes and re-coloured it. I then dragged Sarah's mega cute image of the cowardly lion and place him in the bottom left hand corner and applied a shadow. I then created a digiframe form one of Sarah's ledger embellishments, dragged my photograph into the frame. I created two faux heart shaped mats and placed my framed photograph in the middle. For my journaling I used one of Sarah's journaling cards. I then finished of by adding the Be Brave banner embellishment to the bottom of the heart and added some flower embellishments to the bottom right, so they looked like they were growing at the bottom of the signpost.

I chose to keep the page simple, because I didn't want to distract from Sarah's imagery. This kit and all off Sarah's products can be found on Sarah's website http://www.sarahhurleydesigns.co.uk .

I hope you enjoy my creation. Ian x

Sunday 14 April 2013

My first attempt of colouring in with ProMarkers

I love this Stamp from Whimsy Stamps. This was my first visit to the land of promarkers and I really hadn't any idea how to shade or anything. When I coloured in, usually, I couldn't stay in the lines. I had watched one of the guest stamped the image onto bleedproof card using a black dye based ink. I started on the fairy's hair. I used lemon and  primrose. I used the lines of the stamped image to colour every other segment using the darkest yellow, lemon. I then coloured the remaining segments using the lighter yellow, primrose. I then went over all of the hair with primrose.

I then moved onto the wings. I decided to use the really pale colours, to give the impression of the wings being sheer. I used, from my small FlexMarker collection, pale lavender and pale blossom.
 Now it was time to tackle the dreaded skin. Even now I really don't like colouring in skin, but I muddle through. I'm not too sure on the colours I used, that 's what you get for trying to blog about a card you made months ago. I think I used soft peach and pale pink from the skin accents set of ProMarkers,
   For her dress, shoes and corsage in her hair I used Arctic blue and Sky blue. I wend over the creases of the dress in the darker blue, which was Sky blue, to try and give the dress some shading, I cut the image out, using a X Cut scalloped square dies, it was the second largest and matted it onto some spotted backing paper, which I cut using the X Cut dies again, this time the largest die in the set. I wet glued it to the white 6x6 scalloped white card. Near the spine I tied some red and white twin around the card. From my stash I used a white foiled die cut greeting. To tie the greeting in, I coloured it, using Tim Holtz, Barn Door distress ink and attached it to the card using 3D foam pads.

That's was my ProMarker/FlexMarker, Whimsy Stamps fairy card.

Ian x


Oh no, not another Christmas card.

This is one of the cards that I made to send to the people on my list. This card was made from a kit that I got free with a crafty magazine and used some red mirri. This one was quite quick thinking about it.

I used a green A6 card blank form the kit and matted some red mirri onto it. Then I layered the Partridge paper on top. For the topper I found a light blue Christmas tag, with a partridge on it, but it didn't really match the paper. So to tie the tag in, I stuck it on the some red mirri and cut round the tag. I added a vellum sentiment and attached the tag to the card with 3D foam. I then Added a chipboard, die cut holly and berries to the top left hand corner with wet glue and voila, my free gift, Partridge Christmas card. I always thought that the free card kits wasn't anything to write home about, but, it's what you do with them, that makes them special.

Ian x


My quick last minute Christmas card.

Well I know it is only April and we have just had Easter, but I promised to post the the cards in the order that they were made, so this is my first one.

It was December 21st 2012 and I had made and sent out all of my Christmas cards out and I decided to put my feet up and enjoy the last couple of days in the run up to the main event. I decided to take, Buddy for a walk and when I came back, there was an envelope on the floor. It was a card from a neighbor, who had just moved in and I didn't know that well. I didn't have any back up cards made or any, and I know what I am going to say is a swear word, bought cards, so I made this card. Well enough of my waffle, let me tell you how I made up the card.

I was at a loss, my craftyness had run out completely  and I was just staring at a blank 6x6 scalloped  white card. I started to tear up bit if copy paper that I had written my christmas card list on, and all of a sudden, I thought of using paper to make a triangle Christmas Tree. I found some green Christmas paper and cut a solid triangle out, but it didn't look right. I then cut the triangle into strips and placed it on the card, but I didn't like just having the green, so I cut strips of the striped paper and glued them down in alternating colours and sizes. I then cut a small rectangle for the trunk and a small thin rectangle for the top of the tree, I then used a bubble stamp, to use as the baubles, I stamped the bubbles in Green and red. I then stamped the top with a star, I used a green Christmas tag from my stash and a vellum sentiment, to finish the card off.

So that is my quick last minute Christmas Card I hope you like it.

Ian x


Saturday 13 April 2013

How I found Craft.

Like my profile says I have always had a love of all things crafty, from a young age. I would look at paintings and appreciate the colours and how they went together. I would watch in awe as someone would sketch a landscape in great detail, with the high and low lights created masterfully with a single pencil. Even though I could appreciate the art and even the artist, I wasn't able to emulate the artwork myself. I tried to teach myself to draw, via books at first and then when the marvelous invention called the internet came readily available I watch online lessons, but I had to concede defeat and admit to myself I was not a natural artist. 

One day I was flicking through the many channels that had become available, thanks to Sky and the then named cable and wireless, now known to us all as Virgin Media, I came across a new channel called Create and Craft. I watched avidly and what I learnt from that first show, that there were different kinds of art and not just drawing and painting. I then tuned in for an hour every day, and slowly a light bulb flickered over my head and I thought I could do that. At that time, that is all it was a thought, because of commitments and new interests.

A year later and I found myself living away from my family and unemployed, all this led to my health declining and in fact I was diagnosed with depression. I had so much spare time on my hands, I really could have done so much, but with the the black cloud of depression hanging over me and sucking all the get up and go, out of me, nothing extra was done.  Again the same thing happened, I was flicking and I found Create and Craft again. I can remember thinking why are they showing Christmas things, because it was only June. The product that was being demonstrated, was the pinflair polystyrene snowman and Christmas bell and I can even remember the guests name, it was Christine, Princess Pinflair. I thought to myself, That looks really relaxing and I could make them for my parents for presents. I checked my cash flow and I can remember I was slightly short, but I knew I was going to get paid at the end of the week. I waited and I placed my order for the snowman kit. I was like a child at christmas, excited and willing it to come. My parcelle finally arrived and I opened it straight away. I don't even think I read the instruction, I just started pushing the coloured pins into the shape. It must of taken me about three weeks to finish it, but when it was done, Oh it was a masterpiece, or that is what I thought. I can remember wrapping it up and carrying it with great care on the coach back to Leeds, to take it to my parents. When my parents unwrapped my masterpiece, the looks on their faces said it all. My dad's face said to me, "Gee thanks!" and my Mum's said, "What on earth is it?" I thrust the snowman to them and I told them I had spent ages making it, for them. My mum then gave me the look a Mother gives a toddler, when they have been creative with pain for the first time. I didn't mind though, because I had made it myself, I had made something for them that, they wouldn't get from anyone else. The snowman actually had pins missing, one of its eyes was at the side of its head and the list could go on, but I loved it.
Every Christmas, my snowman comes out, a little more worse for wear, but I still love my first every creation and it reminds me that we all have to start somewhere  and we will have our disasters and our masterpieces alone the crafty road, and we should never give up.

I know what I am going to tell you now contradicts what I have just said, but I did give up after I branched out into papercraft and especially card making. The thing that happened was I put my heart and soul, and still do, into everything I make, and with the my illness, all it took was one bad criticism  to make me, down tool and never make anything for nearly seven years. I never stopped watching Create and Craft in awe of how professional the cards where and told myself, I can never do that.

March 2012, I started buying craft magazines to look at the cards and papercraft projects that had been created, also I managed to gather a few free crafty goodies. My passion was re-ignited and I wanted to start creating things again, but who for. Two months passed and Fathers Day was approaching  and that gave me the chance to get creating. I made my dad a Fathers Day card, from a seven year old CDrom{Us men are really difficult to make cards for} and a card blank I got free with a magazine. I again was pleased with my result and in the post it went. I rang my parents two days after, eager to hear what they thought of the card. It hadn't arrived, so I rang every day until it finally arrived. This time I couldn't see my parents faces, so I didn't really know what they were thinking, but my dad sounded, really pleased. That little boost and I kept watching Create and Craft for inspiration and then it was Christmas, that is when I found the enjoyment and love of crafting again. I will be posting all the cards that I have made since Christmas 2012, in date order and new cards as and when.. Please bare with me, if the images are not clear, I am cameraless and I am scanning the cards into my computer.

So that is my journey so far down the crafty road. I hope you will join me as I continue my journey and I hope you enjoy my creations.

Ian x