1 First open up the
Craft Artist program
2 Choose blank
project
3 Choose what type of project you would like
to work with and press ok
4 A popup will appear with all your digi kits that are already installed. Because we
are creating a new digi kit with Sarah’s kit. We don't need to select one, so
just click on done.
5 Click on tools. That appears in the top tool
bar and chose digi kit creator and this screen will pop up.
6 Click on the import button.
7 A drop down box will appear, you can
either choose add files of folders, for this tutorial we are adding folders,
because Sarah’s kits will go into different folders when they are downloaded.
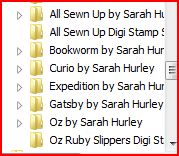
8 Scroll to where Sarah’s kit has been stored
and click on the kit you would like to load into craft artist.
I find it easier if I load the embellishments first followed
by the papers.
10 Click on the folder you want to add first
and click OK.
In about 2 minutes all the contents of the chosen folder
will appear in the box. Repeat steps 6 to 10 until you have loaded the
embellishments and Papers. If you want to have materials in your digi kit you
are creating, you can load in the paper folder and they will automatically
become editable materials when they are loaded in as materials.
Loading Alphabets
1: click on the
alphabet tab at the side of the digi kit creator side tool bar. Click on the
import tab, like we did to add the papers and embellishments and choose add
folder. Scroll to the folder with the digi kit you are loading and find the
alphabet folder, click on it and click OK.
You will see this screen pop up. The final process is a
little bit time consuming but not difficult at all.
2: You will see a
letter, icon or punctuation symbol at the top left hand corner of the box and
then click on the corresponding letter, icon or punctuation symbol. If there isn't any corresponding symbol in the box use your keyboard to match the symbol.
Carry on doing this until the entire alphabet is loaded.
Saving your new
Digi Kit
When you have loaded all the elements of the digi kit all
that is left to do is save and name your new digi kit. To do so click on the
save digikit tab. A pop up box will pop up and then you can name the digikit
and press save.
After that you will see all the elements flash up as your
new digikit is saved and ready for you to craft with.
So there we are, my first tutorial. I hope you find it easy to follow. if you have any questions, please leave me a comment or email me on ian.wharton@hotmail.co.uk . If I can help you I will be happy to and if I don't know the answer straight away, I will find out and get back to you.
Ian xx


5 comments:
Fantastic tutorial Ian and thank you for sharing it with everyone . Even if i dont have Serif YET :) X
Thank you so much for this Ian, I am new to Craft Serif Artist so I guess I will be asking you a lot of questions in the future.
Hugs
Linda xxx
Congratulations on getting your first tutorial done. I'm sure we'll be seeing many more from you now that you've made a fine start with this one.
this is great, well done Ian! :)
Hi Ian, this is a fab tutorial, and I hope you don't mind but I have directed a few people over to it who need a bit of help. I myself have found it invaluable.
Hope you're well
Claire x
Post a Comment